Important: if you have Gaggia Classic EVO Pro (2023), please scroll down to see Note 6 before you place your order.
Update: This kit is compatible with the latest Gaggia Classic EVO Pro (released in 2023) and Gaggia Classic Pro (released in 2018/2019) models, including the regular version (RI9380, 120V, or 240V) and the European version (RI9480, 240V). Please see the compatible model list below (Note 1 on the bottom). For the European version of Gaggia Classic 2015 (RI9403, 240V) please check KIT-GGX-EU.
Product Update: A special Edition with a COUNT-UP timer is now available for KIT-GGP in white LED (demo video link).
This pre-infusion PID kit (KIT-GGP) has all the features of a basic PID kit, "PID temperature control kit for PID Retrofit KIT for Gaggia Classic & Home (KIT-GG)", with the addition of pre-infusion and steam temperature control.
This kit has the pre-infusion function. Pre-infusion is achieved by pumping a small amount of hot water into the coffee ground, holding off the pump for a second to let the water soak in, then starting pumping water for 25 seconds. This prevents the high-pressure water from contacting the dry coffee powder which can create a fast flow channel, ruining the brewing process. It will improve the consistency of the brewing even if you didn't tamp the coffee perfectly. The pre-infusion timer contains three segments: a pre-infusion pulse (Tp), a soak time (Td), and a brew time (Tb). Each segment can be set by the user with a 0.1-second resolution. When the ">" key is pressed, the controller starts the brewing sequence automatically. The pump can be stopped at any time by pressing the ">" key again. This feature allows a user to operate the brew pump manually, with the timer as a reference. A user can also bypass the timer to use the coffee switch on the Gaggia machine to manually control the brewing process.
Use the pre-infusion timer as a shot timer. A user can disable the pre-infusion pulse (Tp) and the soak time (Td) and only use brew time (Tb) as a shot timer to pump a specific time. In a Special Edition controller (available in white and blue LED), the timer counts up from zero instead of counting down to zero. Please watch a short demo video to see the count-up timer in a white Special Edition controller.
The steam temperature control allows the boiler temperature to be held at a tighter range during frothing. The operation is the same as the unmodified Gaggia machine. No extra button is needed to press for frothing. When the steam switch is turned on, the on/off temperature of the heater is controlled to 1 degree (°F or °C) difference as compared with the original thermostat's >10°C (or 20°F) difference. With this tight temperature control, you do not have to surf the temperature for frothing because the heater will kick on much sooner than the original thermostat. The on/off temperature can be adjusted by the user. The installation is completely reversible if you ever want to sell the machine or send it to service.

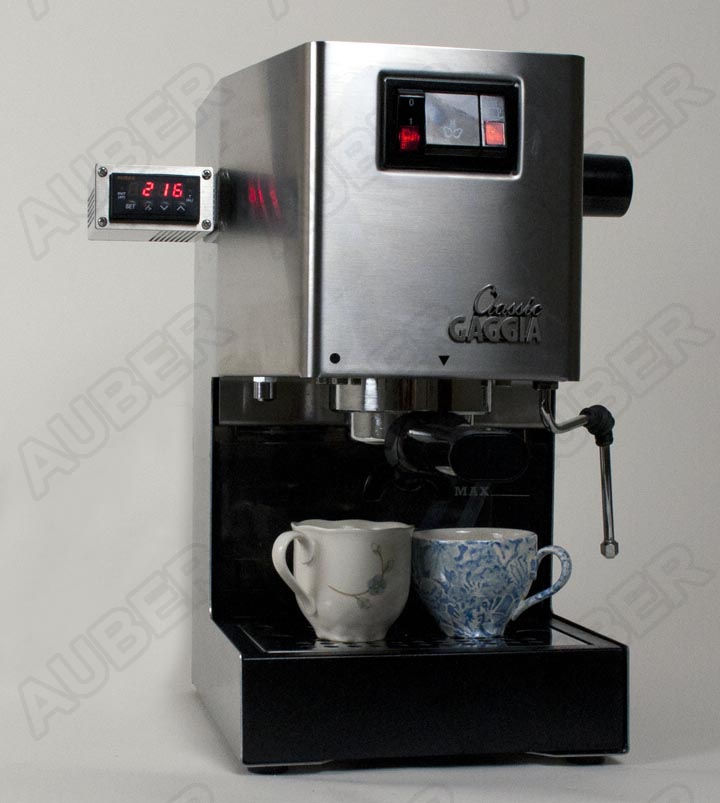
A Gaggia Classic Pro installed with KIT-GGP. (The Gaggia machine is not included in this listing).
Box Color. Two different colors of the controller box are offered, silver and black. The silver box is coated with clear anodized aluminum with a brush-finished stainless steel front panel. It is suitable for Gaggia Classic or other machines with a silver finish. The black box has a durable powder coating. It is suitable for other colored espresso machines. Please select the color of the box at the bottom of this page.
LED Display Color. Red and white colored LED display options are offered. It will give the machine a cool look. Please check the display color option at the top of this page.

Red and white LED color options are offered. (The blue LED color option is available upon inquiry.)
Temperature unit. Select the preferred temperature unit so that all parameters are pre-set properly for you.
(Optional) Add-on Item. This is an extra piece of wire for the European model of Gaggia Classic Pro (RI9480, 230V) with an energy-saving module, which turns off the machine after about 20 min if not used). If you want to defeat that auto-power-off feature, please add this piece of wire to your order. If you have a regular version that doesn't have the auto-turn-off feature, (RI9380, 120V or 240V), you DO NOT need this piece of wire.
Power input. The kit is compatible with both 110VAC and 240VAC power.
Warranty. A 6-month limited warranty with a 30-day money-back guarantee is offered. See
here for details
Instruction Manual: The instruction manual & installation documents are only available for download for customers who already purchased the kit from our website, you can download the manual zip file from our website by one of the following methods:
Note:
1: This kit fits the Gaggia Classic Pro (RI9380 120V or 240V, RI9480 240V) that was released in late 2018 and early 2019, Gaggia Classic & Home which has the traditional Gaggia aluminum boiler, including 14101, RI8161/40, and RI9303 models. Please
contact us if any questions. This kit doesn't fit the new European model RI9403, which has a stainless steel boiler with a different thermostat mounting. For RI9403, please check
KIT-GGX-EU.
2: The add-on option "extra wire defeating auto-off timer" is for Gaggia Classic Pro European model (RI9480, 240V), which has the auto-turn-off feature. If you want to defeat that auto-power-off feature, please add this piece of wire to your order. If you have a regular version that doesn't have the auto-turn-off feature, (RI9380, 120V or 240V), you DO NOT need this piece of wire.
3: For owners of the Gaggia Classic Pro
RI9380 240V version, please check the installation guide "KIT-GGP_Classic Pro US 120V_Installation". If the wiring in your machine is different from the installation guide, please
contact us.
4: Links to replacement parts: sensor
PT100M4; single-channel SSR:
SRDA25; aluminum box:
SBOXS.
5: The PID controller in this kit is
NOT the SYL-1512A. If you need to replace the PID controller, please
contact us for the correct part.
6. If you have Gaggia Classic EVO Pro (released in 2023), please check your machine if the switches are installed with one-piece wire connectors as shown in the photo below. If yes, you'll need some extra parts (
WCC-250-PA).
Please leave a note with your order. For installing KIT-GGP, 13 pcs connector housing are needed for the EU version Classic EVO Pro (with energy-saving modules), or 10 pcs connector housing for machines without the energy-saving module. Here is a
YouTube video showing how to remove the connector block.
 7.
7. After installing the pre-infusion kit (KIT-GGP), the user can activate the brew pump either from the PID controller or from the Gaggia Classic.
8. If you have questions regarding our coffee kits, please check our
Help Center first.
This product was added to our catalog on Friday 12 August, 2011.


